The smart phone world is now booming and all thanks to Android, the only super competitor to the Apple iOS. It is well known that Android is open source. Google is going to make use of a license like Apache and GPLv2 free software to give out the source code under the project Android Open Source.
Today the key challenge faced by Android is the ARM processor on which the devices run and is very difficult to be ported in order to run on something else. A new project Android- x86 has made it successful for Android devices to run on x86 platform inclusive of mouse support and networking. The project is under testing as it is now working on the Ice cream Sandwich model. Here, we will be discussing the installation of Android 2.2.
Android 2.2
This device runs on the Intel x86 hardware. Presently, an older version of Android is being run on the virtual machine which is safe and maximizes functionality and the newer versions can be tested if this is successful. The VirtualBox was installed on the running arch AMD Linux system. It is seen that Android performs better on Intel hardware but the AMD machine also works with just a few warnings popping up. The ICS runs only on the Intel x 86 hardware.
Running the Android OS on Your PC
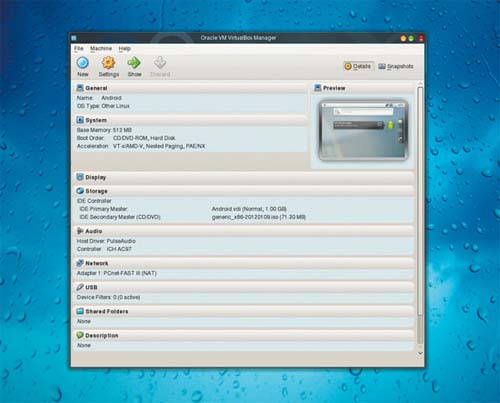
Having the ISO downloaded in the Android 2.2 you can launch the VirtualBox and then click the button ‘New’. The OS is set to ‘Linux’ and the version to ‘Other Linux’.
The next step after creating the machine is to go to settings and check for the activation of ‘Enable PAE/NX’ on your CPU. Clicking on the ‘storage’ page is done to add a secondary device to the ISO image.
Click on the ‘Add a new attachment’ option and add Android 2.2. a dropdown menu would appear by clicking on the disc icon present on the right side where you have to select ‘ Choose virtual CD/DVD disk file’. This completes the configuration. Finally click on ‘OK’ and then the ‘Start’ option. Android 2.2 boots up the virtual machine.
Lastly, you have to click the Ctrl key to select ‘Disable mouse integration’. Clicking on the virtual machine will make the mouse to appear enabling sliding of the padlock icon to enter OS.
Booting Android
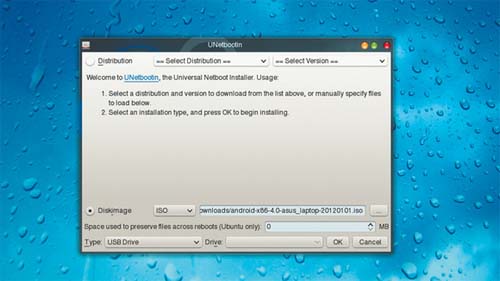
The absence of an optical drive makes the ISO image to be written on a USB stick which will be booted on machine and Unetbooting is used here. After inserting the USB stick Unetbootin is launched.
The bootable data is converted and written on the USB stick and will take just a few minutes. Now the machine can be turned on which will enable Android to be booted.
In the menu now select ‘Run Android x 86 without installation’ option to test OS. Booting of Android takes some time and the starter wizard appears which enables the hardware to be synced with Google account. The applications are then launched from the matrix icon seen on the top right side.
Configuration
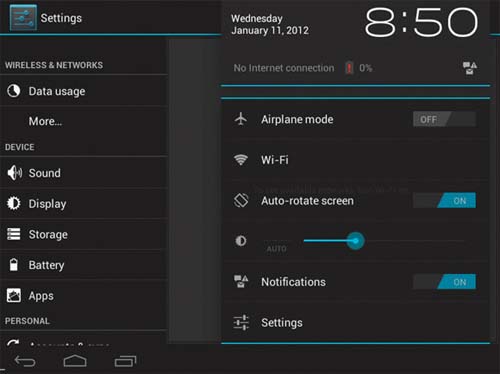
The settings panel is found as you click on the clock icon and then the ‘No Internet connection’ icons. Click the Wi-Fi option to get it working and scan the available networks with ‘Scan’ option. Check that the Bluetooth PAN connection is enabled. Network must be connected after the laptop and Android device are paired.
I hope this quick tutorial helps you in running Android on your PC. In case you come across any issues while setting it up on your PC, feel free to give us a shout and we will be happy to help!

Why would anyone run Android on a PC?
A software works best on the system for which it is designed. I’m sure there will be tonnes of troubles for the users trying to do anything like that..
Windows is there to do the PC job.
Many analysts have concluded that Windows will be the 2nd most used OS for tablets and smartphones soon.
So, soon Android wouldn’t be seen even on Smartphones, PC’s apart. Its lifetime has been reached. Experts call android a resource hungry OS. Give it any hardware and it will eat everything out of it still remaining sluggish.
I don’t think anyone would like to run android on his PC, until he is a Fanboy with eyes closed 😉